Our new sisterMAG DIYs
Our issue sisterMAG No. 63 is full of DIY ideas, which you can find here all at once: Expect homemade stamps, lino printing, balloon animals, cool scrunchies and a rubber basket made from bicycle tyres by My Simply Special! Easy and quick to make – just try it out! And feel free to share your creations with us on social media by tagging us and using #sistermagdiy. We look forward to it!
- DIY: Thea Wittemann , Marie Darme , Svala Werner , Ezbah Ali
- Photos & Videos: Gabriela Morales, My Simply Special
Easily made
Our new sisterMAG DIYs with rubber
#SISTERMAGDIY
#SISTERMAGHANDMADE
#SISTERMAGPATTERNS
In keeping with our rubber theme in this issue, we have put together a few exciting DIYs for you. It‘s hard to believe what you can do with this material. Cute balloon animals to decorate and play with, rubber band stamps and linoleum stamps to give boring bags and pouches an update. In addition, scrunchies – the beautiful hair elastics are quick to make yourself and are extremely fun to do thanks to their diverse design possibilities. They not only enhance every boring ponytail, but also protect the hair because they sit loosely. We have put together three different DIYs for you: a simple scrunchie, tulle scrunchie and linen bow scrunchie. By the way, a scrunchie on the wrist is also a great fashion accessory ;).
Our DIYs video section is making a comeback and you will now find more of them in our upcoming issues. Also check out our social media channels and YouTube for more DIYs.
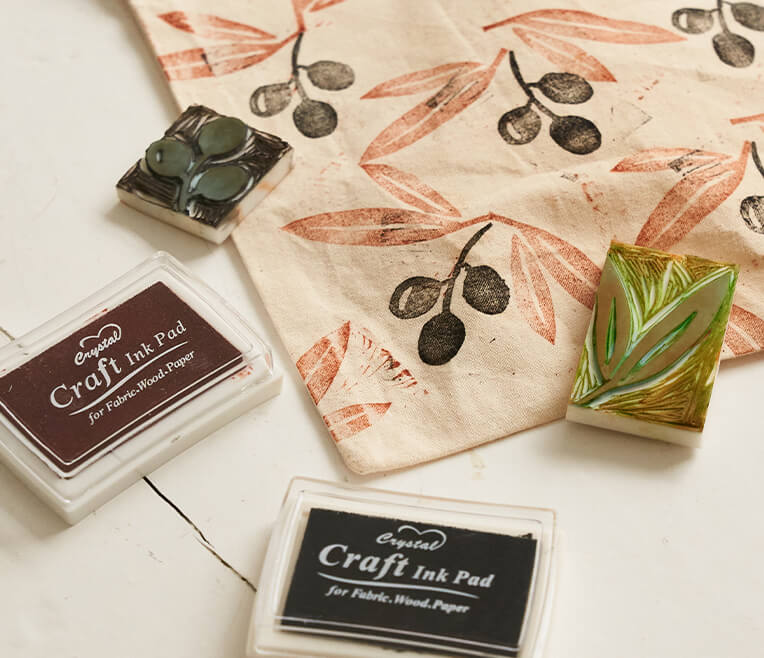
Fabric bag with linocut stamp
Material:
- Pencil
- Tracing paper
- Stamp rubbers
- Stamp pads
- Carving tools
- Cutter
- Cloth bag
- Iron
Tutorial:
- Draw the design with a pencil on transparent paper or directly on the stamp rubber.
- Transferring the motif: Place the drawn motif with the painted side on the stamp rubber and press firmly with your fingers. In the pressure, the image is transferred mirrorinverted onto the rubber.
- Cut a motif plate of the size of the stamp pad with a cutter.
- Use the carving tools to cut the motif little by little. Cutting depth approx. 2 – 3 mm. Now the stamp is ready. Only the parts that have not been carved away will be printed later.
- Unfold the fabric bag and stamp the surface with paint. To prevent paint from seeping through the fabric, place a piece of cardboard inside the bag.
- Fixing: Most colors are then fixed with heat so that they are washable. For this, it is best to look at the product information of the color. In our case, we heated the bag with baking paper and an iron for 2 minutes and fixed the color.
Rubber band stamp DIY
Material:
- a solid object(block of wood or wide eraser…)
- Stamp pad
- Rubber bands, in different sizes
- Fabric bag
- Iron
Instruction:
- Attach the rubber bands of different sizes to the fixed object.
- You can try to create different patterns with the rubber bands: straight, crosswise, mixed…. There are no limits to your creativity set!
- Place the stamp on the fabric and press evenly. Press on. Repeat this step several times.
- When the fabric bag is ready, iron briefly to fix the color on the fabric.
Balloon Animals DIY
Material:
- Small balloons
- Print template
- Scissors
- Hot glue gun
Instruction:
- Print the templates in original size.
- Cut the animals with scissors.
- Blow up the balloons and glue the different parts onto the balloons using a hot glue gun.
- Finished! :)
Embroidered linen bow scrunchie
Material:
- Linenfabric
- Yarn Scissors
- Needle
- Sewing machine
- Rubber 18 cm
- safety pins
- opt. Loop Turner
- Print out the embroidery pattern, cut out the motifs, place them against each other and pin them so that they do not slip. Draw the motifs with a pencil.
- Loosen the embroidery frame at the screw, until the larger frame ring and the smaller inner ring separate from each other. Fix the fabric in between. Tighten the screw slightly and, if necessary, pull the fabric taut all around so that no wrinkles occur.
- Take a thread and embroider the stitches from the to the inside.
- For the flower: knot stitch, stem stitch, magarite stitch, flat stitch.
- For the bee: satin stitch, stem stitch, weaving picot.
- Cut out two loop cut pieces in the break using the cut out template.
LOOP SEWING
- Cut out a strip using the template.
- Place the two loop cut pieces right sides together pin them together, mark the 9 cm opening (this will be used to turn the bow later) and mark mark 1 cm seam allowance.
- Sew pattern pieces together all around, leaving out the leave out the marking.
- Trim seam allowances at tips and cut in curves. Cut in.
- Turn over. Then iron.
SCRUNCHIE SEW
- Close the opening with an invisible hand stitch. Iron both ends of the strip 1 cm over to the wrong side.
- Fold strip lengthwise in the middle and sew together with 1 cm sew together.
- Turn over. Then iron.
- Pull the elastic through and sew the ends together with a zigzag stitch
- Fold in the ironed ends of the scrunchie, pin them together, and now sew them together at the edge. Make sure that the elastic is on the inside and sew it in place.
- Put everything together.
- Knot the loop at the place of the seam around the scrunchie and pull everything finally right.
Tulle Scrunchie
Easy Scrunchie
Rubber basket
Materials:
- 17 bicycle tires
- stapler
- Select tires that are still intact and cut on both sides of the valve. Place 6 pieces neatly next to each other and the same number crosswise on top.
- Weave the tires and push them close together to make the bottom of the basket.
- Time to make the sides! Take a new tire and weave it all the way around the bottom.
- Make sure the ends overlap and secure using a few staples (or glue or needle and thread). Trim any excess material.
- Repeat this step 3 more times.
- Take the last piece and fold all the tires coming up from the bottom around it.
- On the inside of the basket, you weave the ends downwards trough the loops.
- Cut excess material.
- Optional: Secure the ends with glue or needle and thread.
- Clean the basket thoroughly.
Margot von My Simply Special
Would you briefly summarise for our readers who you are, where you come from and what you do?
My name is Margot and I’m 33 years old. I live close to Amsterdam, The Netherlands with my husband and our two young kids. I’m self-employed and work on my blog and different marketing projects.
What did you want to be when you were a kid?
I think I wrote down ‘mother’ once when I was very young and after that, there where many years when I didn’t really know what I wanted to be. In the end I decided to study Industrial Design Engineering.
How long have you been making DIYs and when did you start your blog?
I’ve always loved being creative. When I was young I did things like making bracelets and sewing clothes for my stuffed animals. Later on, I taught myself to sew properly and now I work on many different types of projects for both myself, the kids and our house. In 2013 I started my blog My Simply Special as a way to document everything that interests and inspires me. I share my DIY and sewing projects, interior inspiration, personal stories and more.
How did you come up with the idea of using bike tires? It seems to us such an unusual material?
I prefer a tidy and organised house and was looking for a pretty way to store my kids shower toys. I couldn’t find any stylish plastic options and metal baskets start to rust quickly. I ended up looking into rubbery options and decided to try to make something myself.
Where did the tires come from ;)? How many bikes did you have to take apart?
To get the materials, I just asked a bike mechanic if he had any tires he was throwing away. I ended up with a free bag full and visited the shop twice more the next couple of weeks. This allowed me to sort trough many tires and select the best ones for my project.
What is the next project on your to-DIY-list?
We’re currently changing up part of our house, so I’ll be making a large desk for our office, a pegboard for my sons bedroom and wall decoration for my daughter.


